Grid 패널의 행(Row)과 열(Column) 크기 조절
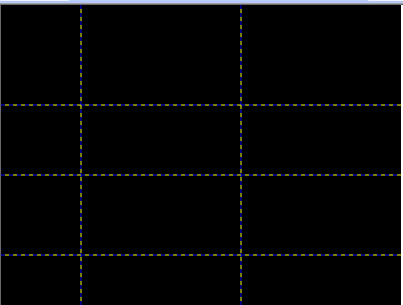
절대 크기 조절(abslute sizing) : RowDefinition에 Height나 ColumnDefinition에 Width의 값을 숫자로 설정한다는 것은 다른 컨트롤처럼 장치 독립적인 필셀을 사용한다는 의미와 같습니다. 절대 크기를 설정한 열과 행들을 일반적인 타입과 비교해 보면 그리드의 크기나 엘리먼트의 크기가 변해도 줄어들거나 늘어나지 않습니다.
아래코드는 임의로 행과 열에 필셀값을 할당하는 예제입니다.

Xaml
<UserControl x:Class="ControlTest13.Page"
xmlns="http://schemas.microsoft.com/winfx/2006/xaml/presentation"
xmlns:x="http://schemas.microsoft.com/winfx/2006/xaml"
Width="400" Height="300">
<Grid x:Name="LayoutRoot" Background="Black" ShowGridLines="True">
<!--네 개의 행을 선언-->
<Grid.RowDefinitions>
<RowDefinition Height="100"/> <!--값을 넣어서 픽셀크기를 고정-->
<RowDefinition Height="70"/>
<RowDefinition Height="80"/>
<RowDefinition Height="50"/>
</Grid.RowDefinitions>
<!--두 개의 열을 선언-->
<Grid.ColumnDefinitions>
<ColumnDefinition Width="80" />
<ColumnDefinition Width="160"/>
<ColumnDefinition Width="160"/>
</Grid.ColumnDefinitions>
</Grid>
</UserControl>
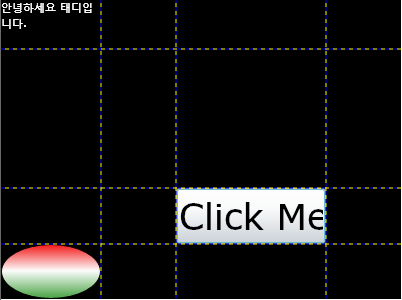
자동 크기(autosizing) : 이전처럼 Height나 Width가 Auto로 설정되면 Silverlight와 WPF에서 기본 값이 설정된 것처럼 자식 엘리먼트들이 필요한 공간만 허용하고 더 이상 가질 수 없습니다. 행은 엘리먼트 중에서 가장 높이가 큰 값을 설정되고, 열은 엘리먼트 중 가장 넓은 값이 설정됩니다. 지역화나 다른 언어 환경때문에 짤릴 염려가 있는 텍스트가 포함되었다면 절대 크기를 설정하는 것보다 이 값을 설정하는 것이 더 좋은 선택입니다.
아래 코드는 RowDefinition Height와 ColumnDefinition Width의 크기를 Auto를 지정하여 자식 엘리먼트의 크기에 Grid 패널의 셀크기를 자동으로 맞추는 예제입니다.

Xaml
<UserControl x:Class="ControlTest13.Page"
xmlns="http://schemas.microsoft.com/winfx/2006/xaml/presentation"
xmlns:x="http://schemas.microsoft.com/winfx/2006/xaml"
Width="400" Height="300">
<Grid x:Name="LayoutRoot" Background="Black" ShowGridLines="True">
<!--네 개의 행을 선언-->
<Grid.RowDefinitions>
<RowDefinition Height="100"/> <!--값을 넣어서 픽셀크기를 고정-->
<RowDefinition Height="70"/>
<RowDefinition Height="80"/>
<RowDefinition Height="50"/>
</Grid.RowDefinitions>
<!--두 개의 열을 선언-->
<Grid.ColumnDefinitions>
<ColumnDefinition Width="80" />
<ColumnDefinition Width="160"/>
<ColumnDefinition Width="160"/>
</Grid.ColumnDefinitions>
</Grid>
</UserControl>
비율 기반 크기(propositional sizing or star sizing) : 이용 가능한 공간을 동일한 비율이나 크기로 나누는 특별한 방법입니다. 비율로 지정된 행이나 열을 Grid의 크기가 변하면 그에 따라 줄어들거나 늘어납니다.
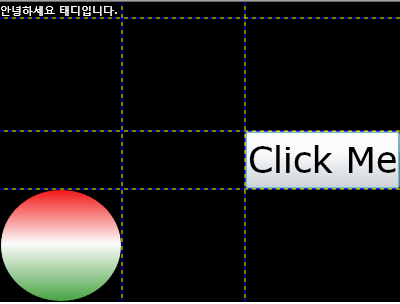
다음에 나오는 코드들은 특별한 값(*:아스터리스크)을 사용하여 일정크기의 비율만큼 크기를 지정합니다.
1) 여러개의 RowDefinition Height와 ColumnDefinition Width의 크기를 *(아스트리스크)를 지정하는 경우

Xaml
<UserControl x:Class="ControlTest13.Page"
xmlns="http://schemas.microsoft.com/winfx/2006/xaml/presentation"
xmlns:x="http://schemas.microsoft.com/winfx/2006/xaml"
Width="400" Height="300">
<Grid x:Name="LayoutRoot" Background="Black" ShowGridLines="True">
<!--네 개의 행을 선언-->
<Grid.RowDefinitions>
<RowDefinition Height="50" />
<RowDefinition Height="2.5*" />
<RowDefinition />
<RowDefinition />
</Grid.RowDefinitions>
<!--두 개의 열을 선언-->
<Grid.ColumnDefinitions>
<ColumnDefinition Width="100"/>
<ColumnDefinition Width="2*" />
<ColumnDefinition Width="4*"/>
<ColumnDefinition Width="2*"/>
</Grid.ColumnDefinitions>
<!--자식 엘리먼트 추가-->
<TextBlock TextWrapping="Wrap" Grid.Column="0" Grid.Row="0">
<Run Foreground="#FFFFFFFF" Text="안녕하세요 태디입니다. "/>
</TextBlock>
<Button Grid.Column="2" Grid.Row="2" Content="Click Me" FontSize="36" />
<Ellipse Grid.Row="3" Stroke="#FF000000">
<Ellipse.Fill>
<LinearGradientBrush EndPoint="0.5,1" StartPoint="0.5,0">
<GradientStop Color="#FFF41515"/>
<GradientStop Color="#FF47A341" Offset="1"/>
<GradientStop Color="#FFFDFDFD" Offset="0.482"/>
</LinearGradientBrush>
</Ellipse.Fill>
</Ellipse>
</Grid>
</UserControl>
나머지 Grid의 셀들은 자동으로 같은 크기로 지정됩니다.
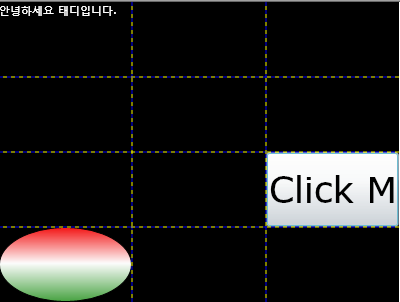
2) RowDefinition Height와 ColumnDefinition Width의 크기를 더 크게 가지려면 단순히 *(아스트리스크)를 사용하는 것보다 2* 또는 2.5*처럼 그 앞에 계수를 사용할 수 있습니다. ColumnDefinition Width를 2*로 설정하면 *를 가진 열보다 폭이 정확히 두 배가 됩니다.
여기서 남아 있는 공간(remaning space) 이라는 의미는 Grid의 높이나 폭에서 절대 크기나 자동 크기로 설정된 값을 뺀 것입니다.

Xaml
<UserControl x:Class="ControlTest13.Page"
xmlns="http://schemas.microsoft.com/winfx/2006/xaml/presentation"
xmlns:x="http://schemas.microsoft.com/winfx/2006/xaml"
Width="400" Height="300">
<Grid x:Name="LayoutRoot" Background="Black" ShowGridLines="True">
<!--네 개의 행을 선언-->
<Grid.RowDefinitions>
<RowDefinition Height="*" />
<RowDefinition />
<RowDefinition />
<RowDefinition />
</Grid.RowDefinitions>
<!--두 개의 열을 선언-->
<Grid.ColumnDefinitions>
<ColumnDefinition Width="*" />
<ColumnDefinition />
<ColumnDefinition />
</Grid.ColumnDefinitions>
<!--자식 엘리먼트 추가-->
<TextBlock TextWrapping="Wrap" Grid.Column="0" Grid.Row="0">
<Run Foreground="#FFFFFFFF" Text="안녕하세요 태디입니다. "/>
</TextBlock>
<Button Grid.Column="2" Grid.Row="2" Content="Click Me" FontSize="36" />
<Ellipse Grid.Row="3" Stroke="#FF000000">
<Ellipse.Fill>
<LinearGradientBrush EndPoint="0.5,1" StartPoint="0.5,0">
<GradientStop Color="#FFF41515"/>
<GradientStop Color="#FF47A341" Offset="1"/>
<GradientStop Color="#FFFDFDFD" Offset="0.482"/>
</LinearGradientBrush>
</Ellipse.Fill>
</Ellipse>
</Grid>
</UserControl>
'.NET WPF' 카테고리의 다른 글
| Silverlight 2 워터마크 컨트롤 (WatorMarked Text Box Control) (2) | 2008.10.24 |
|---|---|
| Silverlight 2 Controls Review - GridSplitter (0) | 2008.10.22 |
| SilverlightContrib Controls 릴리즈 (0) | 2008.10.21 |
| Silverlight 2 Controls Review - Grid 1 (0) | 2008.10.18 |
| Silverlight 2 RC1 Tool 한국어버전 출시 (0) | 2008.10.17 |
| Silverlight 2 Controls Review - StackPanel (0) | 2008.10.17 |
| Silverlight 2 RC1(RTW) 설치(VS2008 영문버전 기준) (0) | 2008.10.14 |


댓글